Chris
G'day guys, we're chatting today to Nick and Jim from Fell Satori Toolworks. We'll try and make this interview flow nicely so that I'm obviously not an interviewer. I don't think you guys have done too many today shows or anything.
Jim
No, just police interviews, not many, not many media.
Chris
So, what you see in this video is what you get, you know, we're the real deal. The guys have got their kids in the background there. My daughter's getting ready for school.

Chris
And, you know, that's the reality of life and working from home and with families, and that's how we really want to run our businesses with, you know, we've obviously chatted offline. Yeah, you guys have both got young kids I've got teenage daughters, and having that as part of our lives is why we've chosen to work this way.
Nick
Absolutely. Yeah, no, it's, and I started before I had a kid, but it's, yeah, one of the things I really look forward to as he's growing up, it's like, I can't wait until the day so I can get him in the shop and just, I don't know, teach him what I know and just like kind of keep the craft going whether or not he wants to do it full time, which I probably doubt he will, but I think it's just really cool to be able to share the stuff that we do with them.
Chris
Yeah, absolutely. Just while Jim's off getting organized, we were chatting about the history of where the name Fell Satori came from. Can you tell us a bit about it?
Nick
So basically my, so I was doing kitchen knives and kind of just odds on, you know, I did a couple of daggers, some swords, things like that, but it was mainly kitchen cutlery. And I was running that under Fell knives, real simple. And then Jim, who is now back, his existing business was in precious metals, doing mostly silver bars. It was Satori, Precious Metals, and, you know, we bounced ideas back and forth on trying to come up with a new name for the woodworking venture. And in my opinion, they all sounded like, you know, you're the teenage band that you put together that the names that you come up with for that. I don't know, it's so hard coming up with names and yeah, after a lot of back and forth, we just decided to combine the two, Fell and Satori. There you go. And it was kind of neat because for mine, Fell, it's to cut down and Satori is essentially like a form of enlightenment. And it's just kind of, you know, you take that first cut with a Fell Satori knife and it's an enlightenment about how you're cutting tools or cutting wood. And yeah, just kind of a fun little just combining what we already had, but it actually works really nicely for what we're doing.
Nick
well, it works so well together. Yeah, not having known you guys in your, in your pre Fell Satori the name just melds together perfectly.
Jim
Yeah, we did feel like he could see that they worked out.
Chris
So I'd love, for you both to tell us a bit about, you know, your history as to how you got to where you are now and what you see going forward and stuff like that.
Jim
Yeah. Yeah. So, um, I, you know, I've spent, I kind of grew up around like people that made tools, um, when I was younger, I grew up kind of rural. My grandfather and father would, you know, fix stuff, you know, fix their saws and you know, sharpen a, sharpen a saw on an anvil. Like I was always around that. So when I started getting into precious metals, I naturally kind of gravitated towards using blacksmith tools. I used the hammers, I used anvils. I never shaped anything by like pouring it into a mold that has a shape. I would just shape it by hand. Um, I was, you know, carving spoons for a while and I wanted to get a better knife and I realized that it was really hard to get a good knife. You had to wait a long time or you had to, you had to search around and find it, or you had to buy it used. And I figured I'd reach out to somebody that I knew made good knives. And that was Nick and we kind of hung out and chatted about it and that's that. And he could talk about this history, but there was no one else I would have paired with to kind of try to execute this idea.

Nick
Yeah, for me, I born in London, moved here when I was about 10 years old, and I don't know what it is, my family has always been into, they're mostly in like photo and film industry, and you know for the longest I thought I was going to be a photographer when I got up school, but when I started getting out of school I started gardening a lot, and I decided I wanted to try running a little landscaping company. It wasn't a very successful one so I had a lot of time on my hands, and basically I was buying wood for spoons to carve, and I found a little knife kit, and I was like oh that seems fun so I made a couple little hunting knives with plate was done and I just put the handles on. But, you know, my biggest thing for me was I really liked cooking and growing food at the time so it's kind of rabbit holed into like okay these hunting knives are cool but how do I make a kitchen knife. And, yeah, enough YouTube and, you know, setting up a fortune the backyard and all of a sudden I was kind of really diving into that one pretty head first. And then from there yeah I made, I made kitchen knives for about seven years before Jim reached out and it was kind of those things you know I got into making knives because I was carving spoons back then. And to kind of have it come full circle where it's like okay now make the tools to make those carving knives, and I was just, I was super into it. And, you know, we met once we made a couple of things in silver, and then within like a week or two of us meeting for the first time we had our first prototype sloyd, which we sent off to Sean her and and got a lot of feedback on it and
Jim
Yeah, version two is pretty good. I mean, we got, I know it was interesting experience that like he and I talked, we discussed geometry, we kind of looked at like, um, one of the things that Nick's very, Nick's very well grounded in, in functionality and I'm kind of an abstract thinker and you know, idea guy. And like we, we discussed geometries and what would work and what wouldn't work. And things like how we have a lot less belly than most carbon knives. And, um, you know, we just kind of went with it and flowed and it came out really good and, you know, a bunch of people to check the forest, make sure it was solid and we were pretty happy with it. So it happened really quick and, um, it just kind of keeps happening. Like with our tube camp recently, uh, the little inshave that we just dropped recently, like everything's working pretty well. So yeah, it's pretty, it's been a pretty, uh, good relationship with, uh, the whole time, but yeah, and then going forward, uh, just more tools. Um, we're getting the tooling so we can start doing axes. We're going to do a different take than what I think most people think of when they think of a carving axe. There's a very Scandinavian style bend where there's nothing wrong with, but we're going to go a little bit of different angle, um, try to make a laser beam carving axe. We're working on gouges. Uh, we're working on chisels, um, different variations of sloyd knives. Um, and then I think one of the principles we both kind of agreed on early is we want to do a lot of other stuff too, just so that we don't get bored because we don't want to feel kind of trapped in a rut. So we're playing with precious metals. We make rings. Um, we're about to start into some cooking stuff like, uh, scoops, spoons, bowls, plates, pretty much. We want to get to the point where we're doing well enough where we can kind of decide what we want to do that day without having, having to ask anybody.
Chris
Wow. So you guys obviously operate on a 40 hour day to be fitting all that in.
Nick
somehow we are getting away with our regular 9 to 5 right now. There's definitely some days I think we need to push a little bit more but we're making it work. We got to have time, we are both family men so we want to make sure that we have our weekends with our family and you know get home in time to get dinner on the table and all that.
Chris
Are you finding time to carve spoons still?
Nick
Just, just barely. I mean, it happens inevitably where we'll be making a bunch of stuff and we have to test it and then we've lost a day because we're just carving things, um, in wood chips in the shop, but you know, it's, it's a, it's a tough balance where we're like, we've got to get the orders that we have out. We got to put new things out, but you also have to make sure that you're taking time to do the craft that you're creating tools for, to make sure that things are forming the way they're most, they're meant to, and frankly, we both enjoy it a lot. So yeah, you just, yeah, you kind of find yourself stuck on it.
Jim
I basically about like I get up at five and about about seven o 'clock the kids get out there breakfast in them They watch a little bit TV or they read a book and for like about 30 minutes I'll rough a spoon out really quick and then later on in the day I'll sneak, you know train about 45 minutes to an hour to carve it But the entire time I'm like putting it down running around so I try to get it in definitely not as much time Yeah, yeah
Nick
So I don't do any carving at home right now. If I do get free time, I'm usually taking that to clean up after him. But I'm excited for when he's a little bit older and I don't have to worry about having sharp tools out around him.
Chris
Oh, you only cut yourself once before you learn quickly. What's the dynamic between you guys? Like how are you making it work together? Who does what?
Nick
Um, well right now it's a bit of a split. We've got Lucas, you want to pop in frame real quick? We've got Lucas, who's about to show up right now. He's been working with me for a while with the Fell Knife stuff. So he's been handling a lot of our rough forging, the blades forged. I'll basically prototype a tool, figure out the steps are to get that thing forged, teach it to Lucas. And then Lucas is able to like batch out a bunch of those forged for us. Um, we'll get the heat treat done usually between me and Lucas. And then my main focus is making sure that the geometry, the bevels are ground perfectly. And I do all the handle work. And then Jim is on every single blade gets sharpened through Jim. And he's kind of handling a lot more of the, just the background, getting the website, make sure that it's worked, uh, make sure that it's worked. Make sure it's working. That's why I do the website. Yeah, he is handling mailing list. And he's also handing a lot of the research and development because while I have carved some knives in the past or carved spoons in the past, I'm not very well versed in like a lot of the tooling. And so he's been making sure that we're kind of focused on, you know, what's the next tool that we need to work. Well, testing that tool to make sure that it works well before we even send it to anybody else for external testing and just yet generally keeping us on track.
Jim
I would say the, the way it goes is, um, I'll kind of look at a tool that I think there's a need for, um, I'll bring it to Nick and I'll usually have some ideas on how we can do it differently. Nick will see how those ideas work in theory. We make a prototype, we use it, we either scrap it or keep moving. And then, uh, typically we get it out to like Sean or Andy or somebody to take a look at it and then if it's good, it's good and we roll. We just want to, we always like, I guess there's a, there's a focus point where we're, we try to do, try to do it differently. Like we try to just put our own kind of spin on it. Um, not because we think other versions are not good or not great, but just because we want to have our own, you know.
Chris
your own. Yep. Yeah. So you're not copying others, you're making your own twist. And yeah, I mean, I know for me, a big of part of a carving tool is the way that it looks. Yeah, I know that that doesn't necessarily affect the way that it functions. But the first part for me with any of my carving tools is I want to pick it up. I want to hold it. I want it to look good. I know that might be a bit shallow. I don't care. If it means that I'm going to pick it up and use it. You're already winning and you guys have got some absolutely stunning aesthetics to all the tools that I've seen and including the Drop Bear which I'm holding right now. It looks so good.

Jim
That's one spot we got like he and I like when we started talking, we had the exact same aesthetic like preferences which is made it really easy to kind of refine down to what we wanted things to look like
Nick
Yeah, and it's been fun. It's like, the first sloyd we made the handle that I made was just not a good sloyd handle. Because I just got a little too, I was, you know, thinking, Oh, it's a tool needs to be more ergonomic than the kitchen knives I'm doing. But in the end, it turned out, it's like, we're basically making what, in my opinion, it's like the Japanese kitchen knife of wood working tools. It's got a very similar handle. It's got the you know, the octagonal wah handle, we just make sure that it flows beautifully with the blade, it fills the hand the way it's supposed to, you're not going to be straining your pinky from its swelling back or skinning out in any way that shouldn't. And it's, yeah, it's kind of fun. It's like, you know, little things like I know we're not the only person to round the spine. But I wasn't sure if that was at like at first, I was like, Oh, like, hey, Sean, should we round the spine? I do that to all my kitchen knives, because it's comfortable. Yeah. And you want the thing in your hand to be comfortable. But I was like, you know, maybe there's a reason you wouldn't want that in a wood working tool. But he was like, Oh, no, most of us, you know, we usually have to round the spines if we want that on our own knives. And I was like, great, we're gonna do that on every single one we put out. Yeah, it's just like comfort is key. You know, it's like I designed knives to be held on the line for eight hours a day. And little things straight corners, they dig into your hand, and they don't feel good. So like, you know, it's like even the handle those facets, they're all gently rounded over to make sure that wherever it's in your hand, it always feels comfortable.
Jim
And like, one of the cool features too, like the way our facets go when you're sharpening the handle guide to you while you're sharpening, you know, you can find that, find that double very easily just using your facets. Like it all flows together to kind of create a direct point.
Chris
And those, I mean, those facets mean that you don't have to hang on for dear life in the handle too, so which reduces fatigue in your hands. Is there anything else you want to tell us about the knife?
Jim
I'm like a fast carver. So the facets were like Nick and me, Nick filming me carving is him going slow down, slow down when I'm roughing or about like for the detail work, sure. I'll go. So when I'm roughing, I want to go pedal of the metal. So having something to hang on to help.
Chris
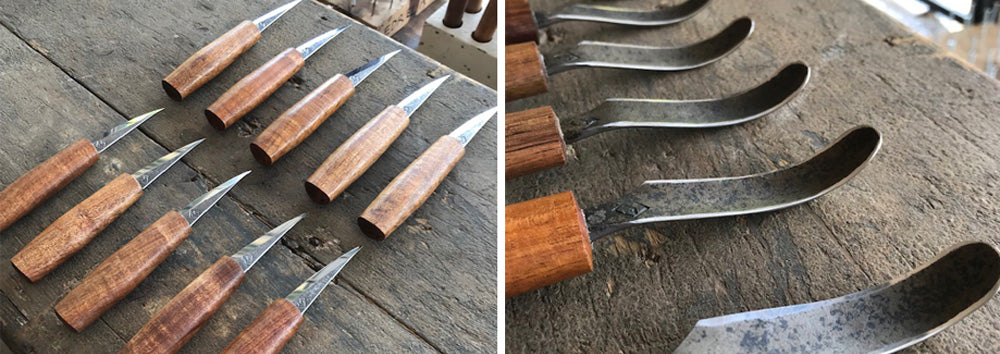
Yeah. And you've done a flat over hollow for the bevel.
Nick
Yeah. Yeah. And we actually, most people go with an eight inch hollow, but we've actually, we went with a six inch hollow, um, for a number of reasons, but we've, we found it's like funny, like we first put it out. We knew that a lot of people were doing eight inch. And so I was kind of like, I'm going to do a six and we're going to send it to Sean and we're going to send it to all these people. And let's see if they notice it. And no one really picked up on it off top. Uh, we've had to like let people know, but it's one of those things where they, they're like, it's easier to sharpen. It's easier to keep clean and it engages really nicely. Cause it's just that little bit skinnier where you're actually finding into the edge.

Chris
That should mean, too, though, that that hollow is actually deeper, correct? Yeah, exactly. So with wear, with sharpening, that means that that hollow's going to stay there for a lot longer.
Jim
I mean, this (holding up a knife they have made) has been sharpened probably, I don't know, I'm trying to see if I can get that on there. It's probably been sharpened 30 times and I mean, it's still, you know, those rails are still relatively thin.
Chris
from tip to heel too, yeah.
Jim
Yeah, Andy's trying to kill his Andy. I don't know how many times Andy sharpened his, but it's still it's still hanging, so.
Chris
Well, I mean, I guess he's got an advantage. He's got a tormek, so he'll be able to maintain it if he needs to.
Nick
Yeah.
Chris
All right, and comes with this great little slip sheath as well.
Nick
Yeah, we've had a mostly positive. We've had a couple of people that are like, oh, I stabbed through it. And, you know, it's, it's a simple leather sheath, but it's like, we were like, we wanted to make sure that every single knife came with something to protect it that we could include for free.
Jim
We're not leather workers. We don't have the time to learn to become leather workers. Like we want to make knives.
Nick
we want to make tools yeah we thought you know we thought it was like an it's an attractive and simple and effective more than anything um carry things on nicely
Chris
you know it's a good good firm fit also means that it goes into a tool wrap easily whereas at the moment you put on a proper sheath you're probably going to take that off to so you can put in your tool wrap yeah that's great job do you guys have any makers in blacksmithing also in carving world that you idolize and who are they and why
Nick
And for the carving tools, it's obviously, I feel like probably everybody's, but Nick Westermann's definitely seems like, you know, he's the top dog. He's, he's got it down. He has beautiful eye for design. His tools perform beautifully. You know, we definitely take an inspiration from his work to try to make sure that we have tools that, you know, perform at that top level that people really want to use.
Jim
Yeah, I mean, like in the States, like Jason Lonnon, he's really inspiring in his work ethic. Like, yeah, I wish we could work as hard as that guy because we would be a lot more productive everywhere. I think, yeah, I mean, pretty much, I mean, like, I think Adam Ashworth with his, like, super sharp, you know, flicky knives that he makes that are, you know, skinny and aggressive. We did that. I mean, we like them all, man. I mean, we like Mora. We respect anybody that makes a knife that can cut and does a good job. Yeah, I think Westermann's, you know, everybody's top dog, but, you know, it's not a competition to us. Like, we make the best Fell Satori knife, you know, we're not going to make the best sloyd knife because some sloyd knives, people aren't gonna like it, you know what I mean? Like, it's, it's about the user and it's about doing the best you can do. But yeah, I have all sorts of idols. Redroni Ironworks is like the god of tooling. He's a tool maker. He makes a lot of decorative stuff. And he has a die or a tool or a setup for every single thing that he makes. And they're all consistent and beautiful. So, you know, we have a lot of guys who look at Alex Bolt. We're big fans of Alex Bolt. He's a fantastic smith. Really good smith. Yeah, I mean, I like I mean, we get inspiration from like, honestly, there's like, there's songs in our tools, we get inspired by anything. And we kind of, we look at what people do and see the positive and try to inspire ourselves to do the positive.
Chris
Nice. Is there any advice that you would like to give to new spoon carvers and green woodworkers?
Nick
start now, get Mora, get going. Yeah, I don't know. And it's one of those things where it's like, it's the same with like, when I first got into spoon carving, I was just, you know, I had a lot of extra time. And I was like, on it, you know, I like doing things with my hands, so I was doing a lot of gardening. And so I was like, all right, my garden's taken care of, I've got nothing to do for the rest of the day. Let me just try carving a spoon. And, you know, it's one of those rabbit holes you study, you know, I started with an Opinel folding knife. It's what I had. And then I was like, huh, I can't carve this bowl. So I ran down to the shop, and I got myself a little hook knife from flex cut, I think it was. And that, you know, that got me through my first 10 spoons or something. And, you know, you just slowly started improving on on your tooling little by little, but, you know, first things first, is just get into it. And you'll find out what you need as you go. Yeah.
Jim
I mean, it's very much a matter of if the spoon can bring food to your mouth and not fall apart, you made a really good spoon. It doesn't matter what it looks like. And you can start worrying about what it looks like later. Um, I think, I think in blacksmithing, spoon carving, one of the secrets is things don't really look nice until they do, you know, like when you're in the middle of the process, things don't necessarily look great. Don't let that discourage you. Um, just, just do it. If you can't afford the tools you want, use the tools you can get skills or skills. It doesn't matter. Like it's not a competition whatsoever. Um, and just go like, don't judge yourself by guys on Instagram that are making beautiful spoons because they got there. They didn't start there and you got to start to just have fun. One of the things that I personally feel not bad about, but like, I see people get discouraged in their carving when they're starting and they get frustrated. It's like, dude, it's a spoon. It's, it's fine. Like it's, we all win. Like if you cut wood, you won. Like you're good. It's not.
Nick
And while they are, you know, relatively far and few between it's like you can find yourself at a like a spoon carving event or somebody's teaching a class. It's a really great way to start because you'll skip, you know, months of trial and error doing it on your own. If you just have somebody that's been doing it a while kind of just, you know, teach you the basics and they'll get you, they'll get you off right.
Jim
Yeah. And I mean, there's a lot of like, if you watch YouTube videos, Andy, Emmett, Sean, just all sorts of guys, just zero in on what they're doing and not what they're making. So like, don't watch the whole spoon, watch them in that cut, try to figure out why they're making that cut, what that cuts doing for the overall design, then try to replicate that cut, you know, don't attack a spoon, attack the shoulder of the spoon, attack the end of the spoon, attack the top of the bowl, you know, you gotta, you have to win a bunch of battles to get a nice spoon. And it's not just one thing.
Chris
What you guys have just said is so good. Like, seriously, like the thing, you know, one of the things that drew me to Spoon Carving was, you know, once all the social media, and I guess COVID has a lot to thank, I guess, for it is that we all kind of came together. And the lack of egos within the carving community is so refreshing. Yeah, you've got these guys like Emmett, like Barn, David Phoenix Creations, they're so giving in their knowledge and happy to help each other out. And everybody is really happy to help each other out. There's not these egos, you know, I came from the surf industry and there's a lot of ego there. Yeah.
Jim
I mean, I'm from precious metals. It is literal cutthroat people trying to kill each other. Like it's, it's, it's not a lot of collaboration in that world. I think one of the coolest, most impressive things is you've got a lot of the guys that people are learning to carve spoons from, they also sell spoons. They are literally giving away free information to their future competition. You know, but they do it because they just want people carving. They don't, they don't care. I think that's really admirable. That's really cool. Same thing with like, I mean, Nick Westermann did a five part series set outdoors where he gave a lot of information out on how he makes the turning sloyd and like, that's precious information, but he wants people making good stuff. So he gives it. And I think that's like, that's pretty admirable. Like Nick still wants to know how to make French toast. We'll not tell him. He's not getting the recipe. I'll die with it. I will die with that recipe. So, but I think it's impressive. And that's one of the things that draws it to it is it's just the collaboration. It's just, people are cool. People are really nice. You know, the, the knife world, it seems to cut throat. Is it pretty chill?
Nick
The knife worlds a little bit of both, you get some people that are super secretive, a lot of like, I mean, I'd say like this, you know, there's definitely a new wave and generation of people getting into it. And for the most part it's like, it's, it's definitely one of those things it's like, people are very open with the information because if you're going to spend the time to put it together and do it like hats off to you like I'll share anything like how I do anything that I do because I just, you know, it's impressive and it's like if somebody else is going to take the time to like, you know, put the work in and actually forge out this blade and do this technique like it's super awesome and I think it's really great that there's more and more people doing it.
Chris
Well, I mean, there's not too many knives out on the market. So I think you're pretty safe there. And, and the carving community just keeps growing, which is.
Jim
That's like the gorilla that we have to wrestle at some point is we want to grow it in Los Angeles, California. And I mean, you're probably talking to the two Greenwood workers in LA right now. There might be a few more, but there's not a lot. And we want to grow it here. We want to get some events going and stuff. And it has its challenges, which is access to green wood. It's very difficult here. And it's not because we don't have it.
Chris
I was actually wondering, what wood do you guys carve there
Jim
oh, we have everything. We just have Sean Hearn send us wood and we get wood from Wild B Wander because we don't have the time to go get it. The thing with LA is a lot of people get wood because it fell because soneone cut their tree down but the thing is we're a very efficient city so when a tree falls it's gone in about 20 mins.
Nick
problem is, it's like, there's a lot of trees that get cut down in my neighborhood. I'm, I'm in LA, Incorporated, where I live, sorry, unincorporated. So it's technically not LA City, but it still is. So we have a lot slower tree pickup, but 98% of it is oak trees and pine trees, which, you know, oak, I mean, it's just so hard to carve with oak, it's such a solid wood, and it's super fibrous and porous. So not the best option. And then pine, while totally fine for carving, you're not going to want to make spoons with it, it's too oily. And so it's kind of a funny one where it's like, I, you know, I have loads of wood around, but it's just not really what we want to be working with.
Jim
that I've gotten have been mostly fruit woods, lemon, orange. I've gotten maple before and there's a lot in the forest is just you can't really go get it because it's protected.
Chris
Yep. What about palm tree spoons? So is there anything else that you guys would like to tell everybody before we wrap up today?
Jim
Oh, really? I mean, yeah, we've covered most of it. I mean, it's like, I guess just like appreciation. People have been really kind to us.
Nick
Yeah. It's been a very welcoming community. Yeah. And it's, it's kind of amazing how, how quickly I, you know, and it's like, I feel like people are kind of recognizing what we do. You know, they, they took a plunge, you know, it's like, we sell, you know, our cheapest tool ever has been like what, 120 bucks. And the fact that people have taken, taking that leap of faith to test our stuff out has been, you know, it's really much appreciated. It's been really fun. We look forward to making a whole lot more stuff for everybody.
Jim
Yeah, it's been, it's been nice. I mean, I think guys that really helped us out. Sean Hearn just stepped up and really guided us through the industry that we didn't understand. Um, Andy, uh, Grant, Wildfoot Wanderer, uh, Matt at, uh, Northwind Handcraft, uh, Emmett's talking to us about other stuff. Hooks, Village Handcraft, Village Handcraft, we've had so many people guide us and then just like unlimited customers letting us know, you know, feedback or what they'd like to see. And, you know, David at Phoenix, you know, telling us that, you know, our glue up suck made us take our glue ups a lot more seriously, you know, and it's good information. So we're just, we're just pretty grateful. It's not like that in a lot of industries where other people help you.
Nick
Yeah, it's good pushing in the right direction.
Chris
I guess too, as makers themselves, being carvers, they've got an appreciation for the work that goes into making something. So when it comes to charging the right price, which we're all guilty of undercharging, I think people will guide you to charge the right amount. Otherwise you won't last. It's got to be sustainable.
Nick
Yeah. Yeah. And it was funny. Our first batch, we had a few people being like, you guys need to charge more than this. And I was like, Oh, well, great. We'll finish our introductory rate. You know, we wanted to make sure that we, we like, so it's, it's past now, but when we first started, we were like first 50 knives. We're going to sell them at an introductory rate because we want to make sure that people, you know, they can take that gamble at a slightly lower rate than what we are at now. Yeah. I don't know. I think it's, it's, it's been good.
Jim
as people grow in craft, they start to understand that tools, tools have a value because of longevity, you know, you, you can buy, you know, you can buy a knife from any of the top makers and it's gonna last you a really long time, you know, like I were a pair of red ring work boots and I paid $275 for them, but I've had them on my feet for six years, and they're still good, and they're still going. So that's a lot of boots I didn't have to buy, you know, you buy something that's, that's made well, it lasts you a long time, and that's kind of the point. Yeah, yeah. Like we want to see one of our, one of our knives get worn down to another, but we also want to make that take as long as possible. So we can do it.
Chris
Yep, perfect. Alright, well, thanks for chatting to me today, guys. I'm super stoked to be working with you. Yeah, I'm so grateful. I think that we've got very similar ethics and motivations. Yeah, thank you.
Nick
It's been a pleasure.