

Have you ever pulled your knife out of its sheath to find that is has rusted since you last used it? It happens to many of us but it is avoidable. Whether you have limited opportunities to carve or you have a knife fetish where you have more knives than you can use regularly you want to look after your investment.
You want to look after your tools so they are ready to go when you are. At a bare minimum I like strop my tools before I put them away as the stropping compound has a wax content to it which will help protect them. It also means that when I pull them out they are keen and ready to go. Oiling after stropping and before putting my knife in the sheath is an extra guarantee.
My Father-in-law, Col, was a very accomplished carpenter in a time when tools were built to last so they came with a price to match. So he takes great care of his tools and I would say that they are as functional as the day he bought them with the added beauty of a life time of use.
I love any excuse to make things with Col because I get see a master at work and hopefully glean as much knowledge as I possibly can. I have often seen him sharpen his tools then finish it off by wiping them with an oil pad that he made as an apprentice.
I recently asked him about it so I could make one for myself and share it with others. Here is what he emailed me:
Hi Chris,
I would have made it in 1962 when I first started my apprenticeship (five years) the first thing you drew and made at the technical college was an oil stone box (which I still have).
When I started we did not have portable electric tools, we had to use hand tools for everything. They needed to be sharp (there was always time allowed for sharpening) this of course was Chisels, planes and saws. These tools had to be looked after, in those days they for life.
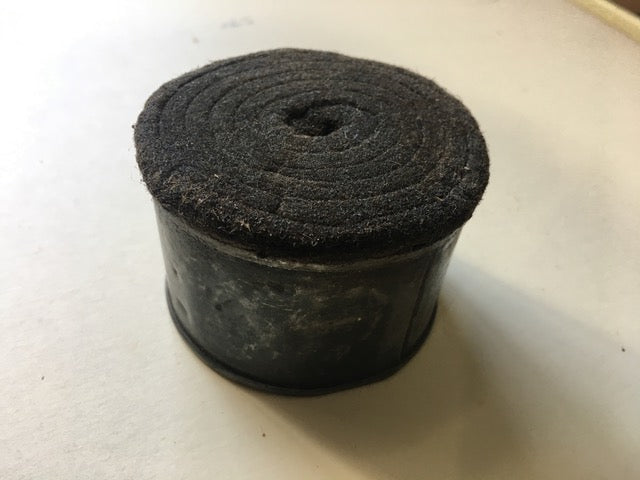
So what of the oil pad? Its made from old floor covering felt (a form of carpet that was used) and an empty baked bean tin with the felt rolled tightly and fitted in the tin, then soaked in engine oil. Its use. To wipe over the saw as you worked to cut down friction ( we did a lot of hand sawing to build a whole house) and to use on the sole of the plane, also to cut down friction whilst using it. At the end of the day the tools were wiped over with to keep them free from rust (remember they are for life).
Right, its coffee time! Any questions?
Col
Here's how I made my own.
What you'll need:
- Felt tile (or whatever you can get your hands on)
- Old tin (I am using a milk paint tin so I can screw the lid back on)
- Oil
- Carton knife
- Ruler
- Hammer

Instructions:
- Cut felt into strips so that the felt will sit a few mm above the top of the tin.
- Coil the felt around the edge of the tin and continue adding strips until a final tightly rolled strip fits in the centre.


- Remove the felt from the tin and have an extra strip at hand.
- Starting with the tightly rolled centre piece wrap additional strips around it keeping it tight as you go until you have coiled them all together including the extra strip.

- Push the coil back into the tin and use a hammer or mallet to knock it flat. Be careful not to hit the side of the tin like I did.


- Soak the felt in your chosen oil.

Now you have no excuse not to have well oiled, loved tools.
As carvers we are lucky to have some amazing tool makers out there and their tools rightfully cost more than mass produced tools. That said, mass produced tools rust too, we should look after and respect all of our tools so they will last.
We would love to hear from you if you have any tips you on caring for your tools or have any questions you would like answered? Have you seen something that older generations do that should be passed down? Please comment below.

Share:
Curly Questions - Adam Ashworth
Curly Questions with Pete Von Trott
5 comments
Learn the art of making a tool oil pad and elevate your woodworking game! This essential accessory ensures your tools stay lubricated and in top condition for precise and smooth operation. Follow our simple guide to create your own tool oil pad and enjoy enhanced performance and longevity from your favorite woodworking tools. https://www.woodtamer.com.au/
Hi Chris
This is great knowledge that you have shared but any tips on removing rust. I received a pair of Sloyd knives in January for my birthday and one is starting so show signs of rust
Thanks
Great part of any tool kit regardless of the size. I made mine from an old pineapple tin and cotton rags but the same process.
Thanks for sharing!
Yes, I have been using one of these rag in a can oilers for many years, ever since I saw Master woodworker Paul Sellers of the UK demo how to make one like he ones has been using for @50 years. They work great. Never use linseed or similar oils that cure and evaporate and that can cause spontaneous combustion. I use 3-in -1 light, General use, petroleum based oil found here in the USA. I always wipe my cutting and other tools with it after I am done using them. Never have a rust issue. Great little shop aid and easy to make.Rolled up pieces of old cotton tee shirts work too. Best to keep them loosely covered with anything handy, like a large plastic cup to prevent drying. Very highly recommended and I like the felt idea. Thanks for showing this nice demo of how to make one.
Wow! Great tool, thanks for this! I may use an old Altoids tin and pack vertical stips of felt instead of coiling. Cheers!